Service
— 5 stages · 1:1 drawingInstallation & wiring
The best installation scenario is a balance between aesthetics, ease of servicing and the technical requirements of the particular lighting composition and interior.
The first covers hanging the composition to the 1:1 drawing. The second continues it: parallel wiring, three supply schemes, driver sizing and how to split the composition into branches.
Five installation stages
01
Cargo inspection
On delivery, check the boxes for integrity and inspect the packaging: photograph any defects and send them to our support team. The top of the box is marked with Vargov®Design branded tape. One of the boxes contains the 1:1 installation drawing on banner fabric, used to position every element precisely.
02
Surface preparation
A plasterboard ceiling is reinforced with plywood backing at the fixing points: the plywood must be at least 9 mm thick. Following the 1:1 drawing, holes of 8–14 mm diameter are drilled depending on the type and mass of the fixings.
03
Running the services
For 12–24 V — low-voltage cables from the driver (in the distribution board or the void above the ceiling), one per element. For 220 V — a cable to the installation point with a junction split across the number of elements, using junction boxes or terminal connectors.
04
Fitting wires and cables
Every wire and cable carries a tag: its number matches a position on the 1:1 drawing, and the tag itself acts as a height stop — during installation it rests against the ceiling fixing, setting each element at the exact level with no confusion.
05
Wiring up and final check
Wires are joined to the elements through terminals, observing polarity. Once every connection is made, switch the power on and check that each element of the composition works.
Fixing nodes
The 1:1 drawing
Installation follows our full-size drawing. It is issued electronically once the 3D model or mock-up of the composition has been approved; the printed 1:1 drawing on banner fabric is shipped with the composition, in one of the boxes. Hole positions are set out from it, and the numbers on the suspension tags match the numbers on the drawing.
Which node to use
- 01First by light: a light-emitting element hangs on the wire that also feeds it — a Ø14 mm hole. A non-emitting decorative one goes on a cable, a Ø8 mm hole.
- 02The gauge within the chosen kind follows the mass of the element — that is what the ranges on the drawings mean: wire 2–3 mm, cable 0.4–0.6 mm.
- 03A heavy element does not get a different node — it gets several cables or wires at once. How many is calculated at the factory for the specific piece.
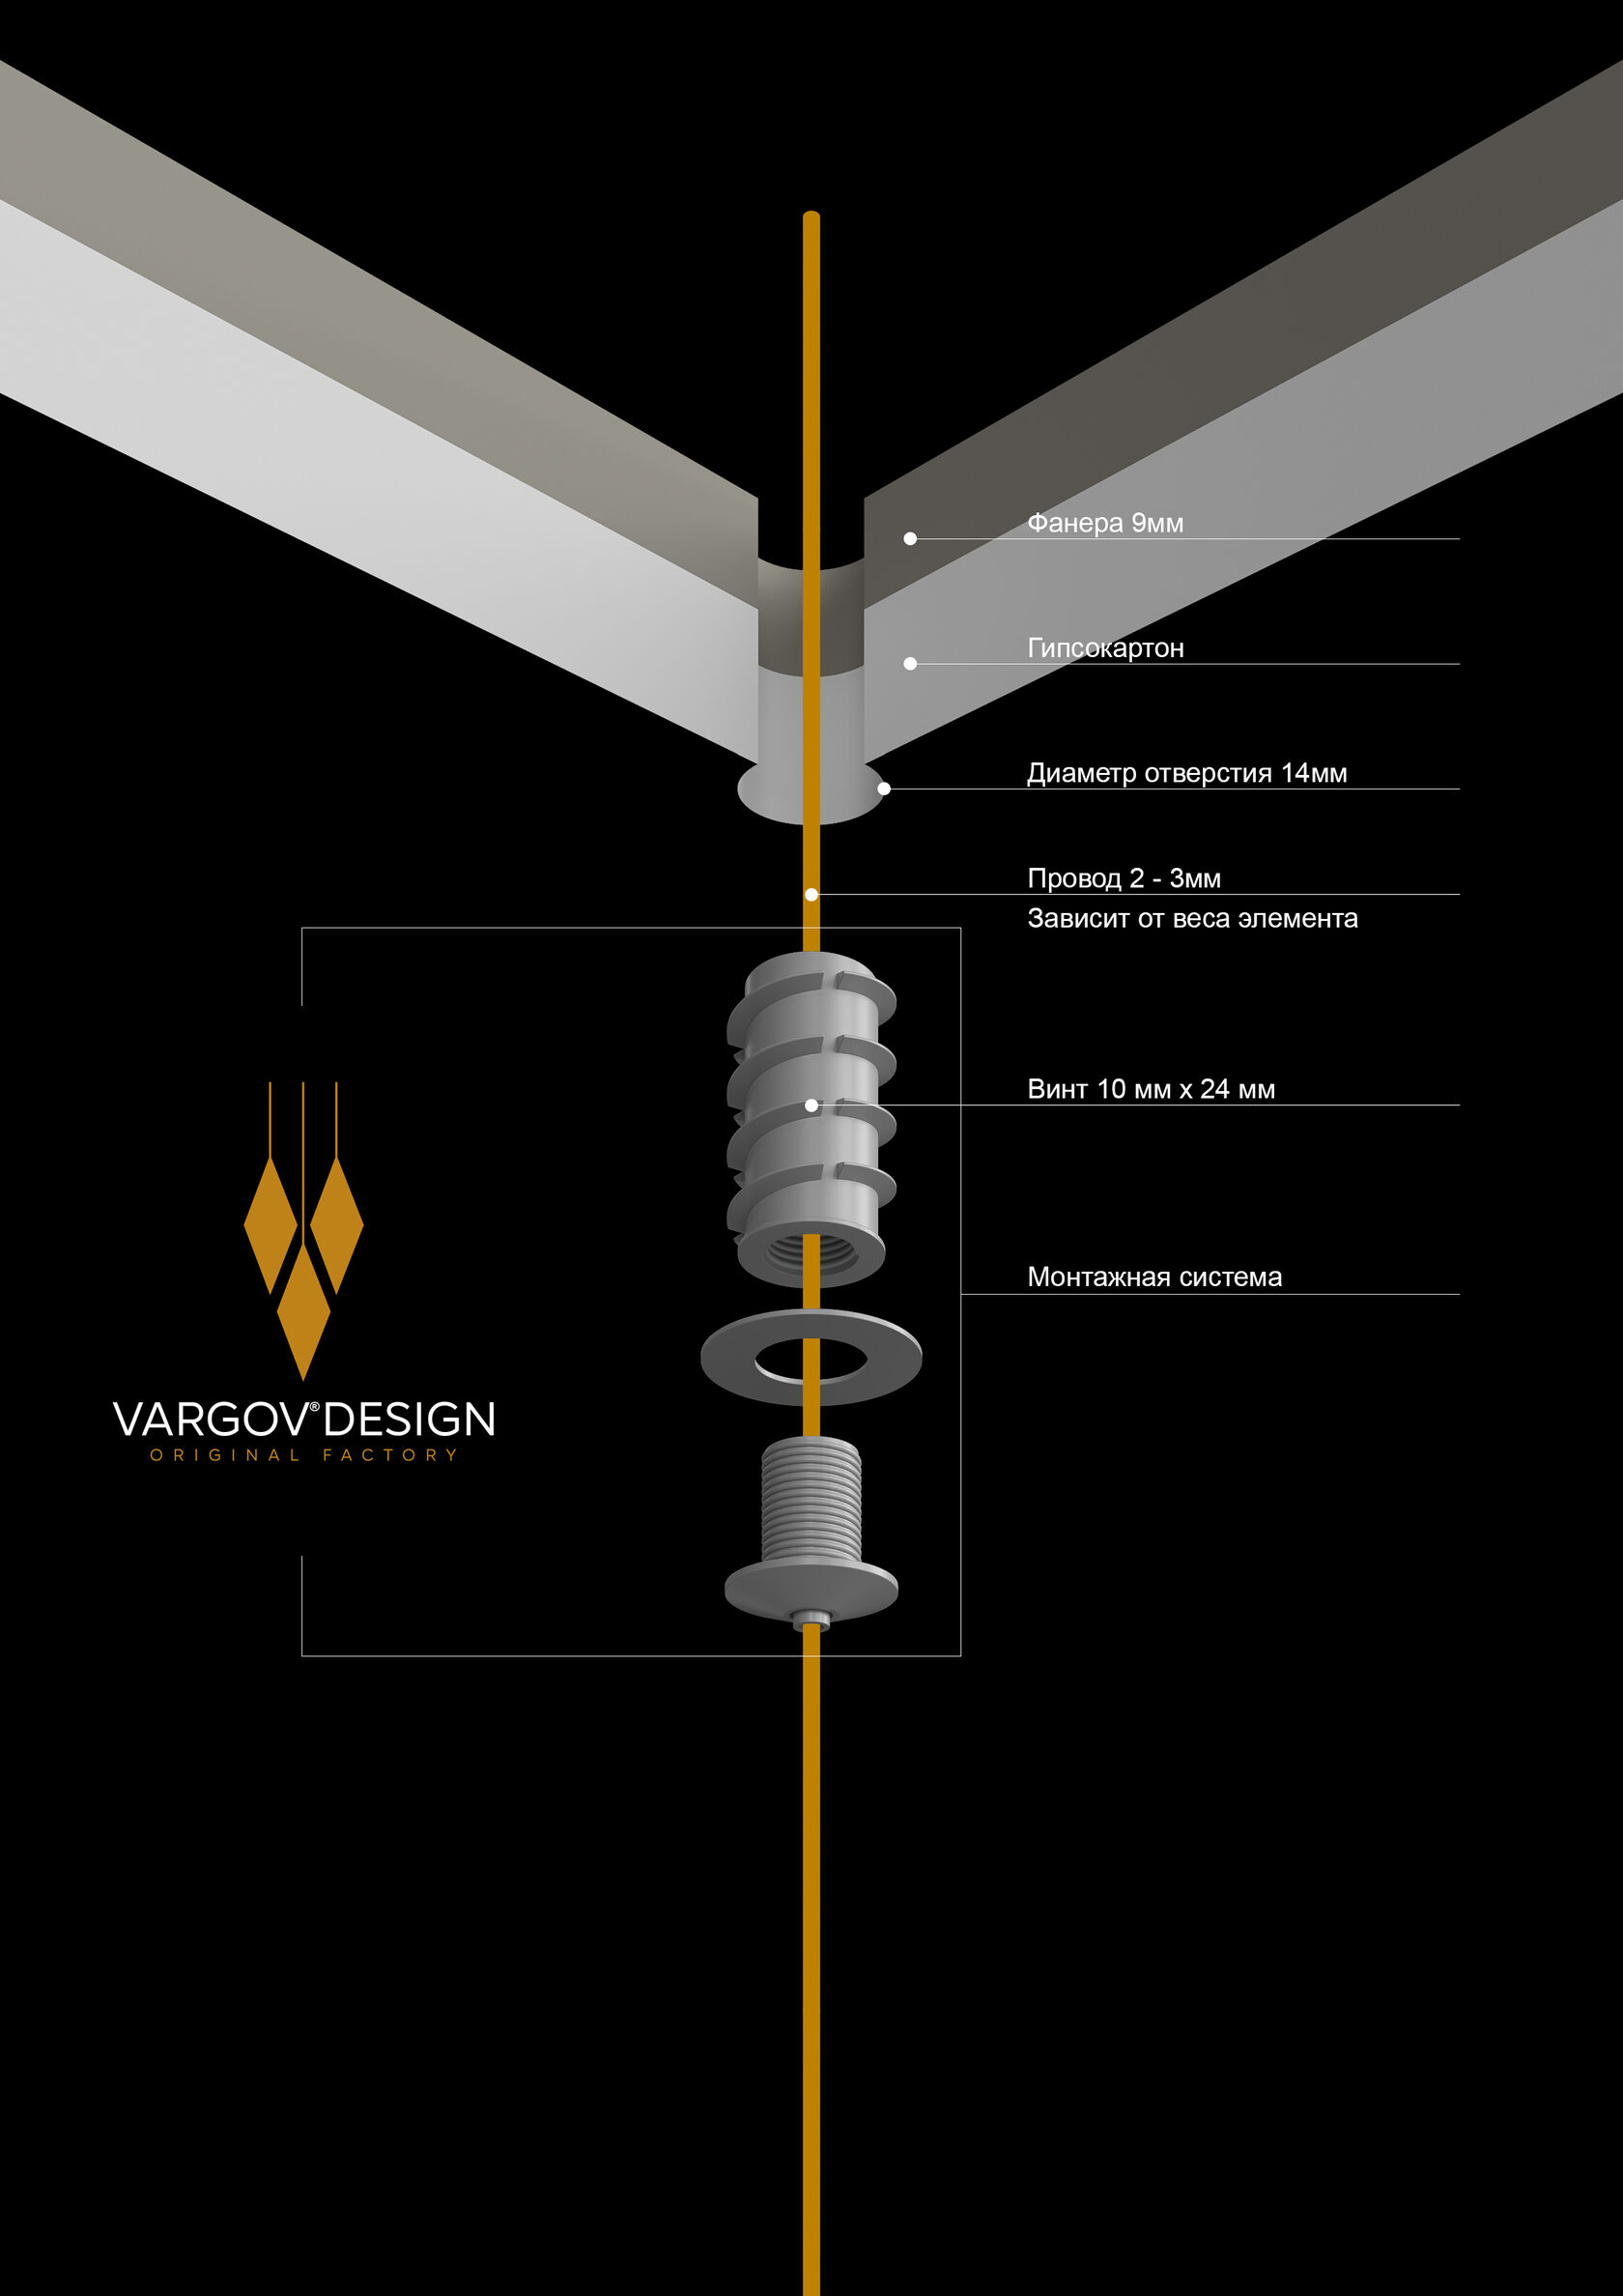
Wire suspension
For light-emitting elements: the wire both carries the element and feeds it — power and suspension on one line. The gauge is chosen according to the mass of the element.
wire 2–3 mm · hole Ø14 mm · screw 10×24 mm
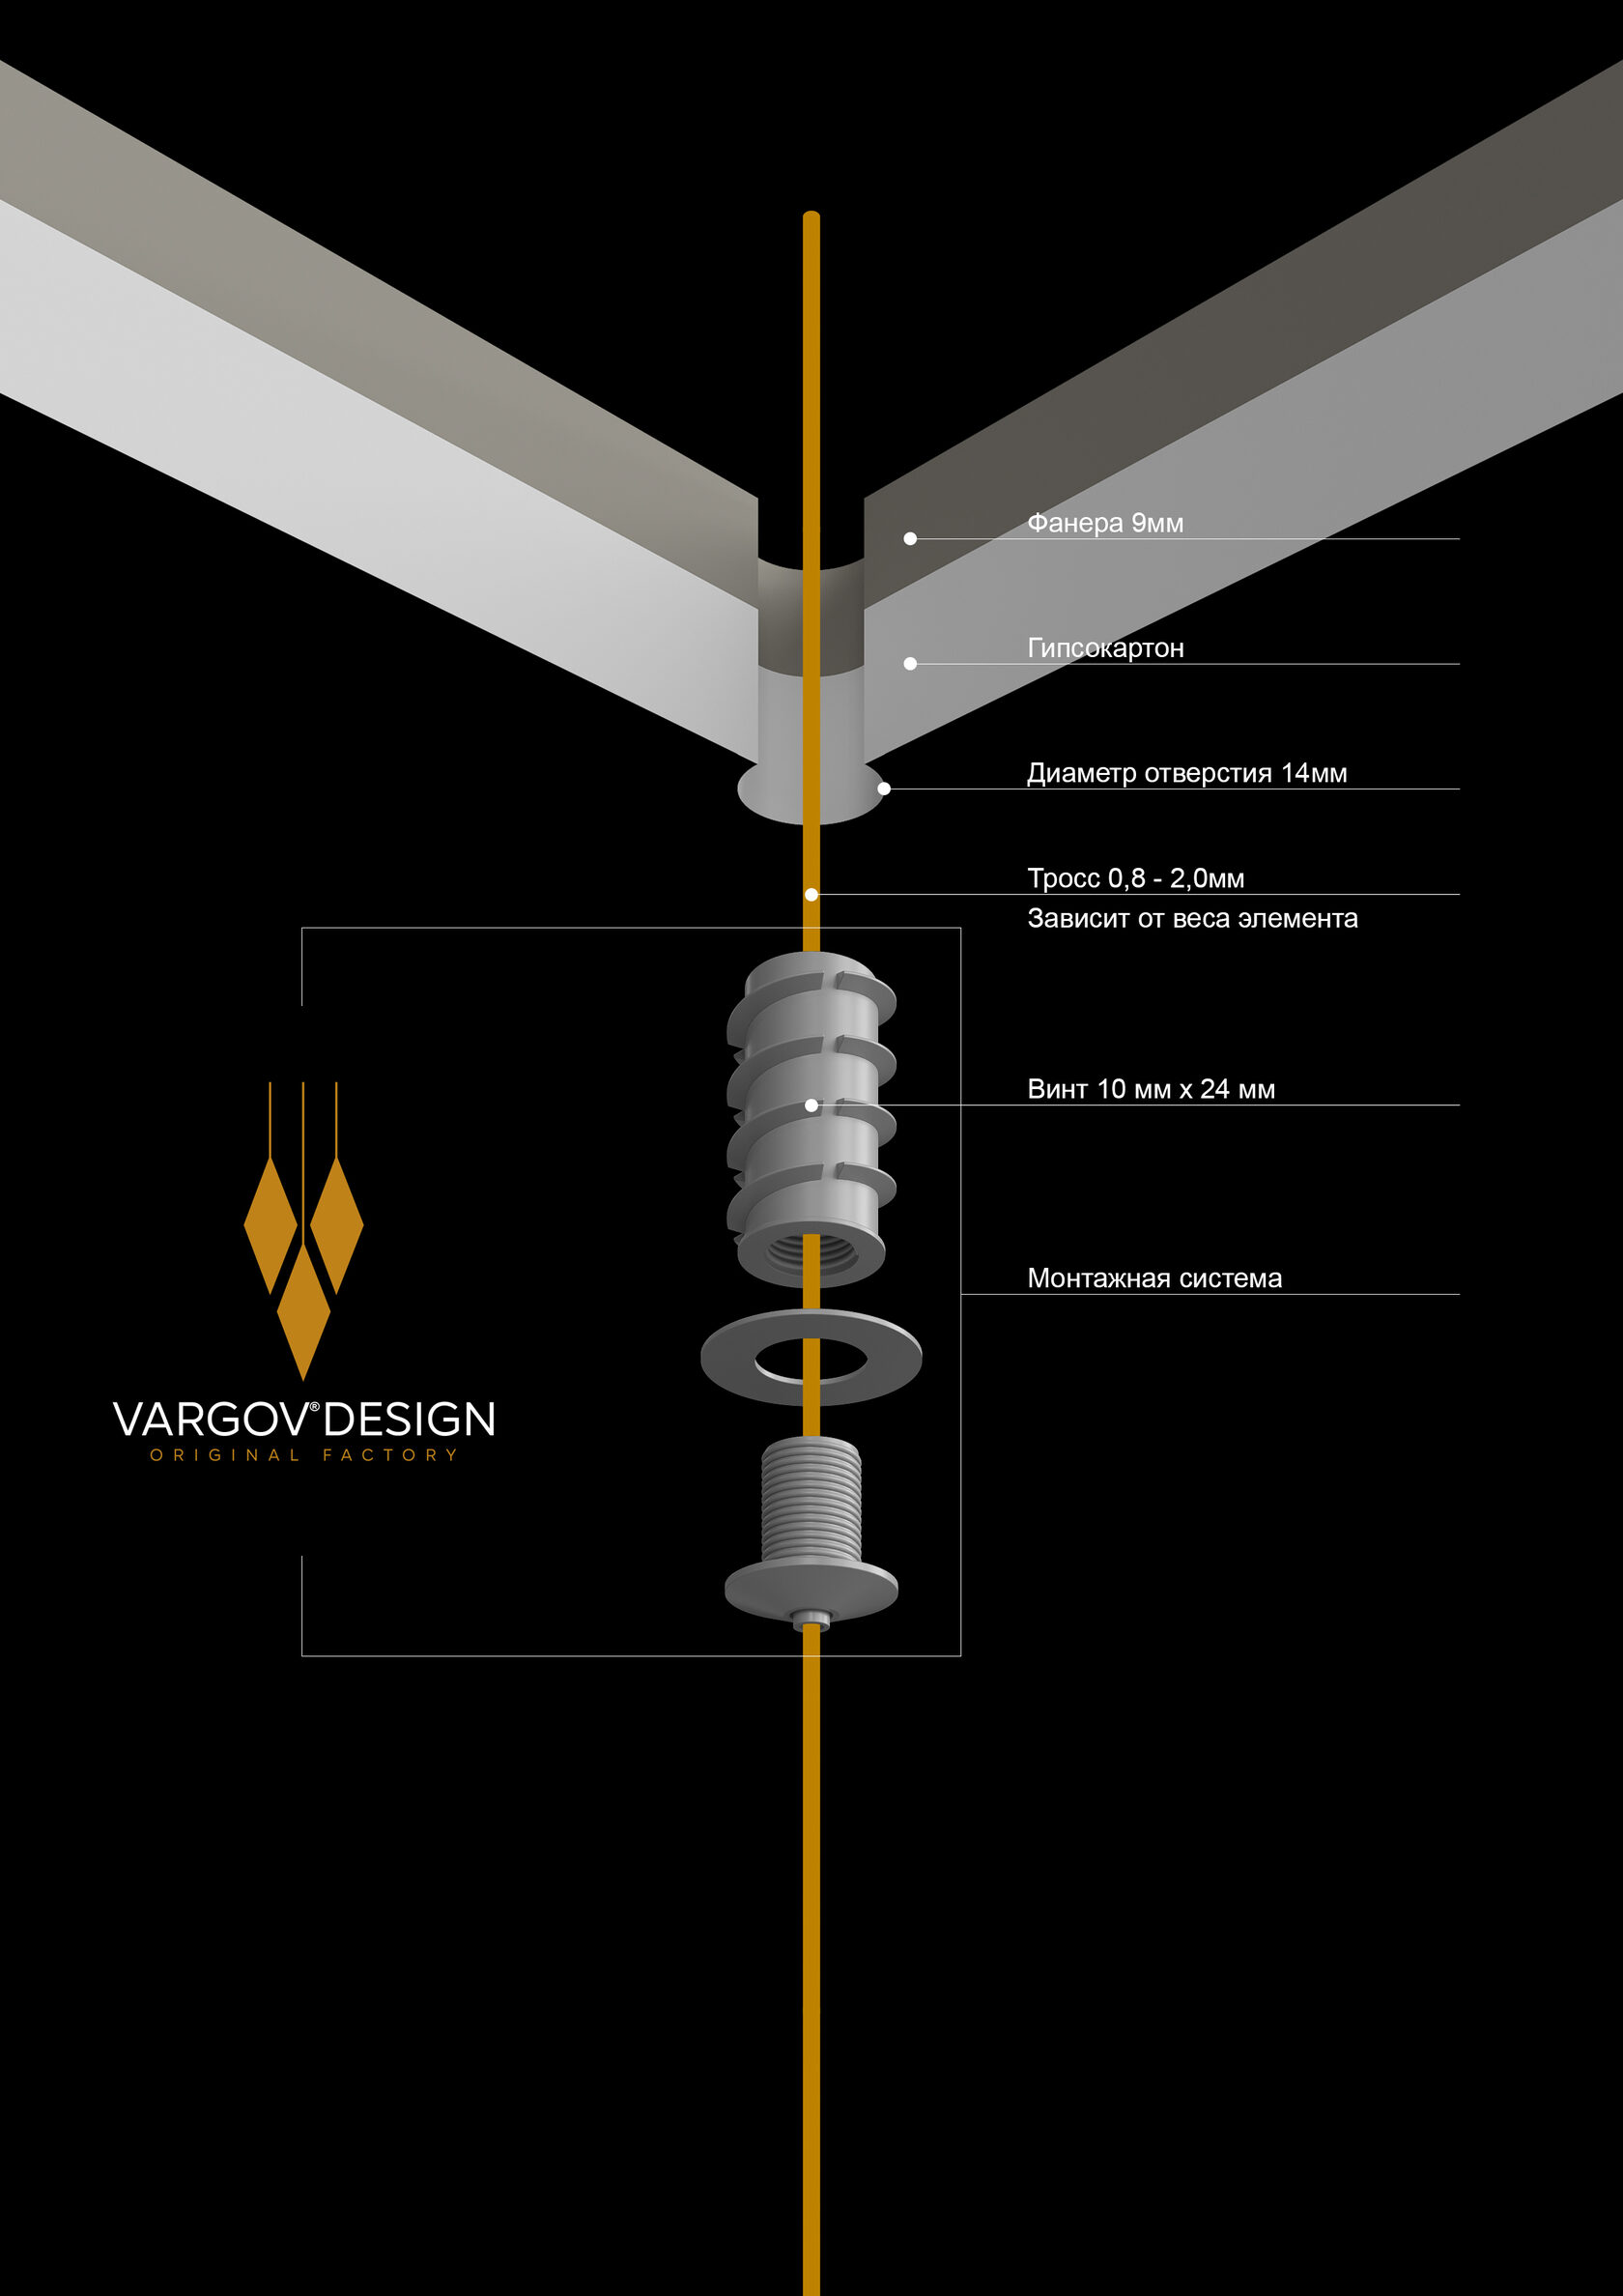
10×24 mm kit
The load-bearing cable node: a 0.8–2.0 mm steel cable, element weight up to 5 kg. The cable diameter follows the mass of the element. The kit is used at the factory for a specific piece.
cable 0.8–2.0 mm · hole Ø14 mm · up to 5 kg
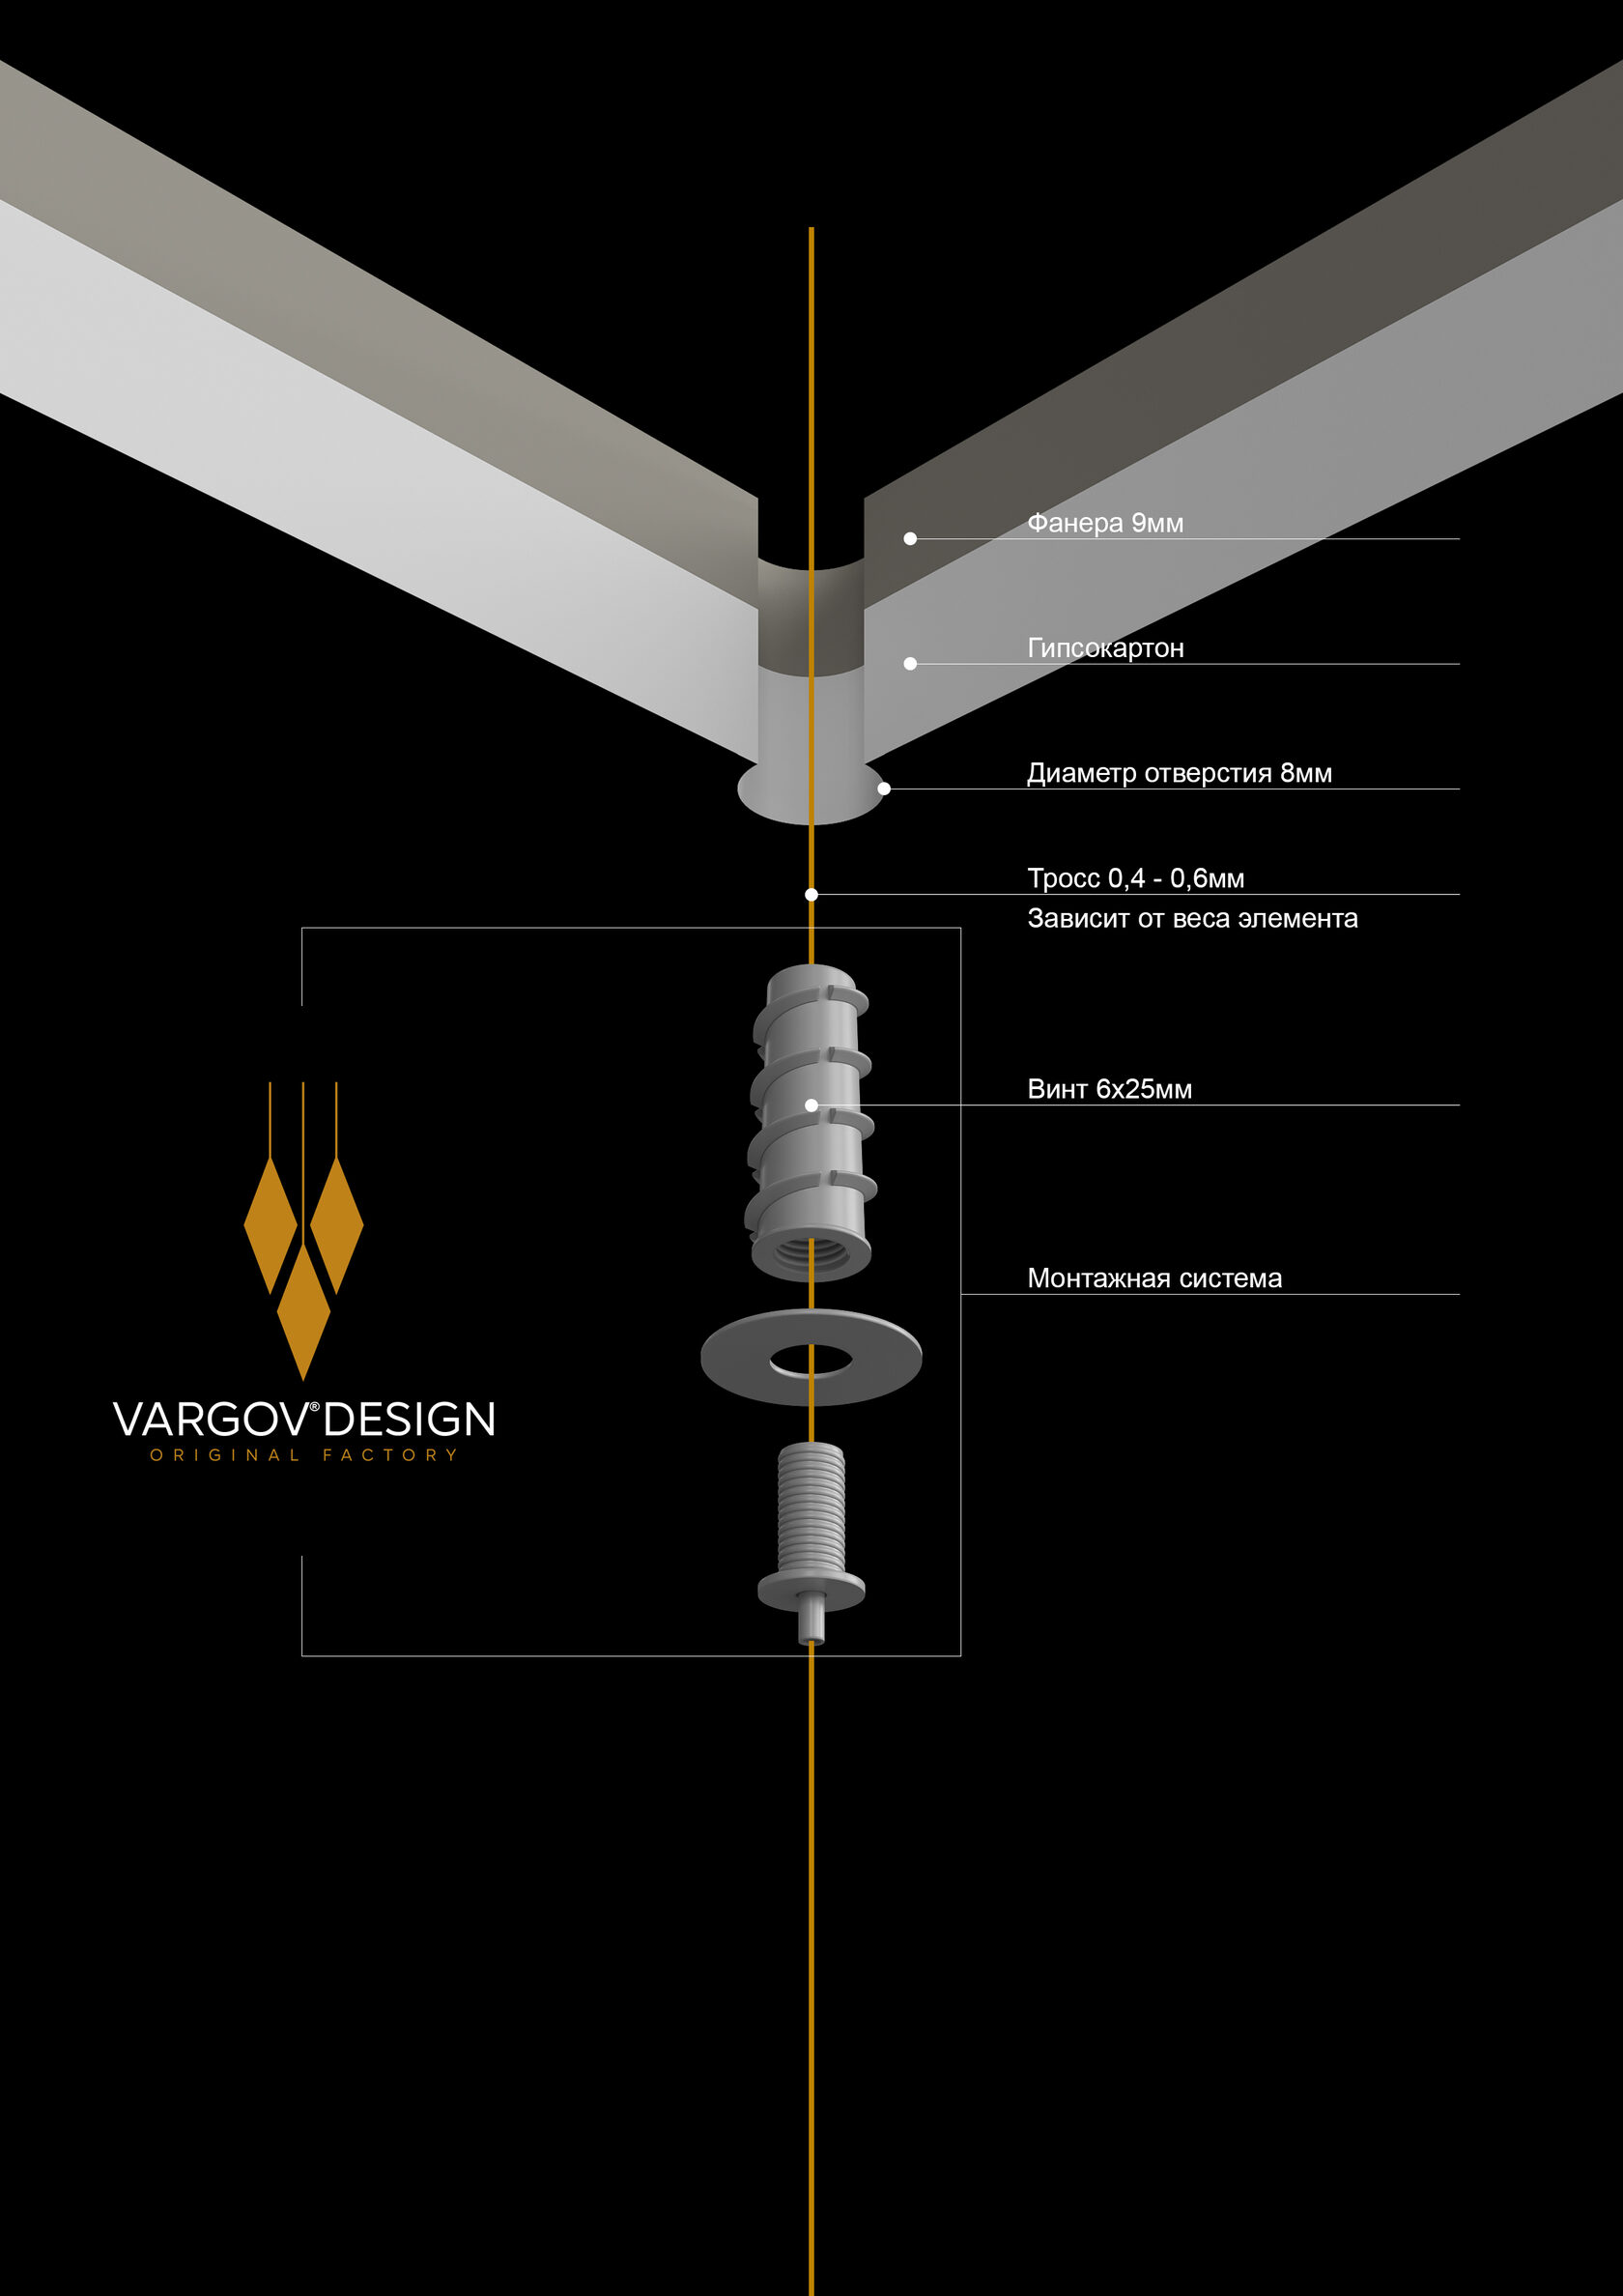
6×25 mm kit
For decorative elements without light: 0.4–0.6 mm cable, weight up to 1 kg. The hole is half the size — the node is almost invisible on the ceiling.
cable 0.4–0.6 mm · hole Ø8 mm · up to 1 kg
The base is the same in all three nodes: plywood backing at least 9 mm thick over the plasterboard. Hole diameter and screw size are chosen by the type of suspension and the mass of the element — 8–14 mm, as set out on the 1:1 drawing.

Tag on the wire or cable
The number on the tag matches a position on the 1:1 drawing — the installer sees immediately where this suspension belongs. Its second function is as a height stop: during installation the tag rests against the ceiling fixing and sets the exact level of the element.
Wiring scenarios
12–24 V LEDs
Through a driver — in the board or the void above the ceiling
- 01The driver is included in the delivery — allow space for it in the distribution board or the void above the ceiling (where there is an access hatch).
- 02Run 12–24 V low-voltage cables from the driver to the installation point — one per lighting element, allowing for length and resistance losses.
- 03Reinforce the ceiling with backing and drill the holes according to the 1:1 drawing.
- 04Pull the cables through the holes and join them to the elements with terminals, observing polarity.
- 05Connect the cables to the driver and test the system.
220 V LEDs
Direct connection to the mains, no driver
- 01Run a 220 V cable from the distribution board to the installation point.
- 02Split the supply across the number of elements using junction boxes or terminal connectors.
- 03Reinforce the ceiling with backing and drill the holes according to the 1:1 drawing.
- 04Pull the cables through, join them to the elements with terminals and test the whole composition.
If the ceiling is already prepared and there is a single 220 V outlet — use the base plate of the composition, which houses all the connections and drivers (base height from 80 mm), or an access hatch to place the driver in the void above the ceiling.
Ingress protection — any IP rating on request: it is set during manufacture to suit the room, not picked from a ready-made range. Name the conditions — humidity, outdoors, pool, hammam — and the composition will be built for them.
Which installation to choose?
On a prepared ceiling with backing
Pros
- +Minimal visibility of the fixings — everything is hidden above the ceiling and the composition reads as completely clean.
- +Saves space — important in rooms with lower ceilings.
- +Flexibility: elements are mounted at different heights, exactly as set out on the 1:1 drawing.
Cons
- −The ceiling has to be prepared: plywood backing, drilled holes.
- −Servicing the drivers requires access to the void above the ceiling — so space for the driver is allowed for in the distribution board.
On a base plate
Pros
- +Full integration: drivers and connections sit inside the base — the system is self-contained.
- +No special ceiling preparation is needed — a single 220 V outlet is enough.
- +All technical parts are accessible in the base — servicing without touching the ceiling.
Cons
- −A base from 60 mm tall takes up room on the ceiling — undesirable with low ceilings.
- −The base adds visual bulk — not always right for minimalist interiors.
With an access hatch
Pros
- +Quick access to drivers, wiring and system components for servicing.
- +Technical parts stay hidden above the ceiling — a clean appearance.
- +Unplanned repairs without disturbing the ceiling structure.
Cons
- −The hatch can be visible on the ceiling — particularly in minimalist interiors.
- −Space for the hatch has to be allowed for in advance, at the ceiling design stage.
Installation on stretch ceilings
Our lighting and decorative compositions integrate successfully into every kind of stretch ceiling.
With complex suspended compositions what matters is not only the form but the engineering behind it — precise backing, load calculations, correct wiring and an understanding of the ceiling structure. Which is why it matters so much to work with people who genuinely know the material.
Vargov®Design partners install onto every kind of stretch ceiling: from classic solutions to complex multi-level structures.
Supervised installation
Professional supervision of the installation and wiring of Vargov®Design lighting and decorative compositions by our specialist — guidance and oversight even when the work is carried out by an outside team.
Who it suits
- —Those installing themselves or through outside specialists.
- —Those who want to avoid mistakes, keep the warranty intact and get a flawless result.
How it works
- 01Send us a WhatsApp message with the request “Supervised installation”.
- 02Our specialist will call you back and advise on every aspect of installing and wiring Vargov®Design compositions.
Price
Telephone consultation — ₽5,000. Where required, a specialist can attend the site for supervision and recommendations (charged separately, agreed individually).
Request supervisionRecommendations
Choosing a scenario
Access matters
For larger projects where future access to the system is important — an access hatch: easy reach to the technical components for servicing.
Minimalism and low ceilings
Installation on backing without a base — preserves space and the purity of the design.
High ceilings
A base conceals all technical components and simplifies both wiring and servicing.
Safety
- Before starting work, make sure the supply line is switched off — this rules out short circuits and electric shock.
- Use only good-quality terminal blocks, heat-shrink tubing and jointing materials — this removes the risk of fire or damage.
- Given the complexity of the compositions, we strongly recommend installation by the official Vargov®Design installers — this guarantees that every element works correctly and stays intact.
Official installers
Russia, CIS
XPROJECTLIGHT
Nakhimovsky Prospekt 24, pavilion 2, stand 211, Moscow
Persian Gulf, Middle East, Americas, Europe, Asia, Africa and other regions
Vargov Design International
Showroom 1, Al Asmawi Building, Sheikh Zayed Road, PO Box 24710, Dubai — UAE
Vietnam, Laos, Cambodia, Thailand, Malaysia, Singapore
VITRILUX SPACE CO., LTD
4th Floor, No. 2 Thang Long Avenue, Tu Liem Ward, Hanoi City, Vietnam
Installation
Book installation with the official team
We will answer your questions on installation and wiring, price the work and agree the schedule with your site.